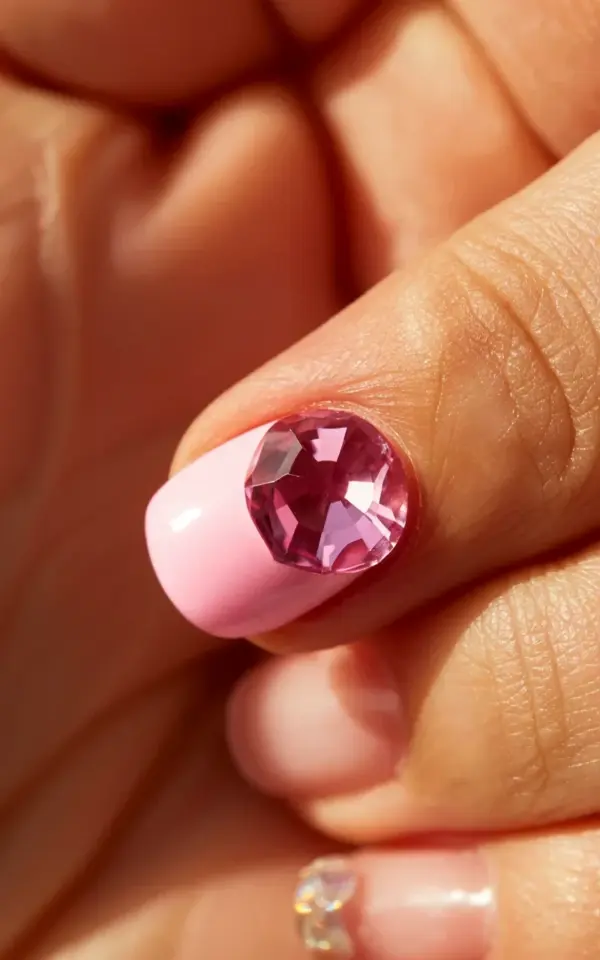
The pink glow nails photos you keep pinning all have one thing in common. They were taken after the rhinestones had plenty of time to set. I know because I’ve ruined that exact manicure twice. The photo in this post shows a large pink crystal, prong-set into a light pink base, catching light like a tiny piece of jewelry. That sparkle isn’t just the filter. It’s patience.
Why the Base Coat Drying Time Controls That Pink Glow
Most people stick rhinestones onto a wet or tacky base coat because they think the stone will sink in and stay. That works for glitter, not for serious sparkle. When you press a faceted crystal into sticky polish, the flat back gets coated in color. The sides get flooded. Suddenly your pink crystal looks like a pink smudge.
And honestly, the mistake starts before you even open the glue. The base coat you choose matters. A thick, opaque polish dries slower and forms a soft film that moves around. A sheer milky pink dries faster and gives the rhinestone something more stable to sit on. That’s exactly what you want for that glowing, radiant look.
The Prong-Set Trick: What That Macro Photo Doesn’t Show
Look at the macro shot up top. The rhinestone isn’t glued directly onto the nail bed. It’s prong-set, which means tiny metal claws wrap around the crystal and hold it slightly off the nail. That’s why the light catches the geometric facets so sharply and creates that clean sparkly reflection. You don’t need a real jewelry setting at home.
But you can fake the effect. Let the pink base coat dry completely, then add a small dot of thick gel or nail glue. Place the stone on top and let the adhesive grip around the edges. Keep the top of the stone clean. The light needs a clear path to the crystal’s surface.
Rhinestone Nail Mistakes That Kill the Sparkle
Here are the mistakes I see in almost every flatlay or salon photo, plus one that always catches people off guard. Use this as your checklist before you start.
- Sticking the stone into wet polish. This is the number one way to lose the sparkle. The polish coats the bottom and dulls the facets.
- Using a base coat that’s too thick. A thick layer creates a puddle for the stone to sink into. Thin layers work better.
- Skipping the glue. Some gel polishes are self-leveling. They won’t hold a stone in place overnight. You need a proper nail glue or a thick gel made for gems.
- Pressing too hard. You don’t need to push the rhinestone into the nail. Just rest it on top and let the adhesive grip.
One extra thing. Don’t do your nails while sitting on the floor with a cat nearby. My cat once walked across my nail mat and the whole afternoon ended with a paw print in my pink base coat. Not my finest moment.
How to Apply Rhinestones on Pink Gel or Regular Polish
Ok so here’s the step-by-step that actually works. It feels like a lot of waiting, but the waiting is the whole point. You can do this with gel or old-school regular polish.
First, apply your pink base in two thin coats. For that pink glow nails effect, use a sheer milky pink with a peachy warm tone. Let each coat dry for at least two minutes.
Second, wait until the nail feels dry to the touch but still has a slight grip. That’s your window for placement if you’re using regular polish. But honestly, it’s safer to wait longer. If you tap the nail and your fingerprint doesn’t transfer, you’re good.
Third, place the rhinestone with a wax pencil or a toothpick. Touch only the edge. You want the flat back to stay clean and free of oil. Then apply a tiny dot of nail glue or a thick gel top coat. Set the stone on top and press lightly for ten seconds. Don’t move that hand.
Fourth, seal the edges with a thin top coat. Cover the base of the stone, not the top. The facets need to stay exposed and dry. That exposed surface is what makes the light bounce like jewelry instead of getting swallowed by a layer of polish.
A Simple Timeline for Radiant Finish Nails
Plan for an hour, not forty minutes. The last fifteen minutes are just letting everything set. That’s not wasted time. That’s the price of sparkle.
Minute 0 to 10: prep and clean your nails. Minute 10 to 20: apply base coats. Minute 20 to 30: let everything dry fully. I mean fully. Minute 30 to 40: place the stones. Minute 40 to 50: seal with top coat. Minute 50 to 60: sit still and watch a show or scroll through Pinterest while the top coat hardens.
That last step is where I used to cheat. I once placed a rhinestone, then immediately tried to text a friend. The stone fell off into my soup. Not a great look. So now I keep my hands flat on a desk for those final ten minutes and admire the shallow depth of field effect in real life.
Nail Care That Makes the Rhinestone Last
Pink glow nails with a big crystal need gentle treatment. The main rules are simple: no soaking, no oil-based hand cream near the stone, and no using your nails as tools.
Water breaks down the glue. Oil slides between the stone and the nail. And opening a soda can the night after your manicure will pop a rhinestone straight off. I’ve seen it happen more times than I count.
If you want the crystal to stay put for a week or two, wear gloves when you wash dishes. Apply cuticle oil around the base of the nail, not directly on the stone. And when you finally remove the nail art, soak it off gently instead of picking it off. Your nail plate will look better, and your next manicure will go on smoother.
So save this post for your next manicure. Whether you’re doing one accent nail or all ten, let that pink base fully dry before you add any stones. The crystal will catch the light, your nail care routine will stay simple, and you won’t spend the weekend fishing rhinestones out of your clothes. Your future pink glow nails are worth the extra fifteen minutes.
Leave a Comment