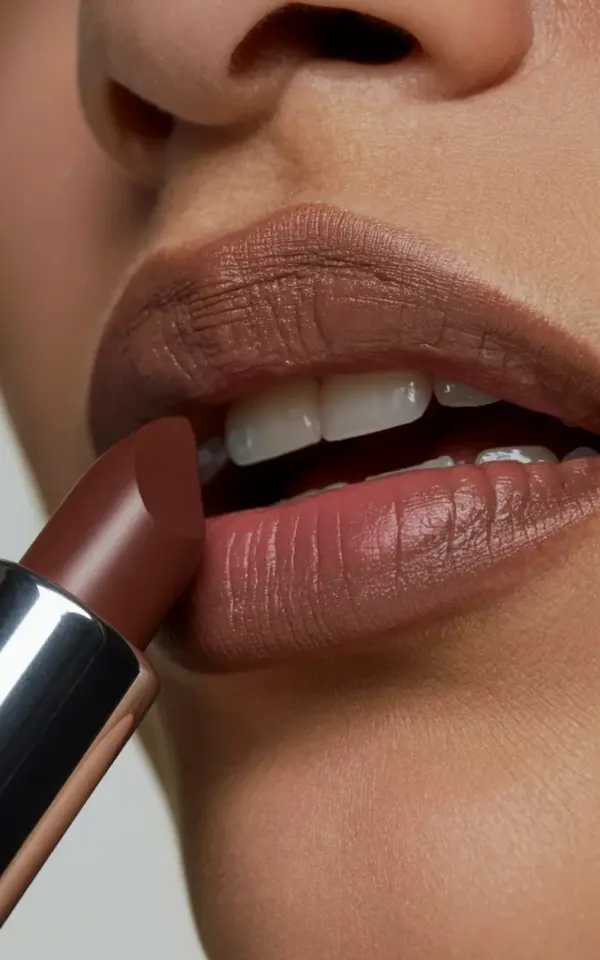
There’s a specific moment in the photo that got me. The lipstick tube is still pressed against the lips, black and silver, mid-application, and the bottom lip has already taken on that deep chocolate shade while the top stays softer, almost mauve. That’s the thing about matte brown lipstick, it looks intimidating in the tube but absolutely cozy once it’s on.
And honestly, this ombre combo might be the most wearable fall lip look I’ve seen in a while. No liner tricks, no overdrawn edges. Just two shades, a little blurring, and letting your natural lip texture show through. That’s where the cozy part comes in.
What Is an Ombre Lip and Why Does It Work for Fall?
Ok so ombre lips have been around for years, but the current version is much softer than the harsh gradient we saw in the early 2010s. Back then, it was basically a dark lip with a pale center. Very dramatic. Very Instagram. Now, it’s almost the opposite. You’re putting the darker shade on the bottom lip and a lighter one on top, like what’s happening in the photo, or you can darken the outer corners and leave the center brighter.
The effect should be subtle. Like you’ve been sipping hot cider all afternoon, not like you spent an hour in front of the mirror.
For fall specifically, the combination of brown and mauve just works. Brown brings the warmth, mauve brings a hint of that cold-weather flush, and together they read as effortless. You don’t need a perfect lip shape either. The ombre look actually forgives uneven lips because the gradient distracts from the edges.
Why Brown Lipstick Looks Flattering on Almost Everyone
Look, I know brown lipstick can feel like a gamble. It’s not pink, it’s not red, it’s brown. But here’s the thing, brown lipstick is one of the most versatile shades you can own. It pulls warm and rich, and because brown contains both red and orange undertones, it tends to complement a wide range of skin tones without clashing.
The trick is finding the right brown depth. A deep chocolate like what’s on the bottom lip in the photo works beautifully on deeper skin tones, and for lighter skin, you can build it up or apply it with a lighter hand. Blot it. Press it in. That matte finish does a lot of the work for you.
Also, brown lip colors photograph really well. Something about the way they catch natural light gives lips a soft, almost suede-like finish that glossy shades just don’t have. That’s why you’ll see it popping up all over Pinterest for fall lip colors.
The Exact Products You Need (Nothing Fancy)
Beginner-friendly means you don’t need a 40-piece lip kit. For this exact look, you need:
- One deep chocolate-brown matte lipstick, the one in the tube in the photo is a perfect visual reference
- One lighter mauve or dusty rose matte lipstick for the top lip
- A lip liner in a shade close to your brown, optional but it helps keep the edges clean
- Your finger or a small lip brush for blending, a fingertip honestly works better
That’s it. No primer, no concealer, no fancy tools. You could realistically do this with two lipsticks you already own, even if they’re not exactly the shades in the photo. The point is the gradient, not the specific colors.
How to Apply the Matte Brown Lipstick Ombre Look
Let’s walk through this step by step, because the order actually matters. Here’s the thing, most beginners start with the top lip and then mess up the bottom, or they apply both shades before blending and end up with a muddled mess.
First, start with clean, exfoliated lips. You don’t need a lip scrub, a damp washcloth and some gentle rubbing does the job. Then apply a thin layer of balm and let it absorb for a minute. Wipe off the excess with a tissue. Matte lipstick and balm don’t mix well, so you want the balm mostly gone.
Second, apply the deep chocolate brown to the bottom lip. Really saturate it. Don’t worry about precision yet.
Third, apply the mauve shade to the top lip. Now, here’s where the look comes together, press your lips together once. Just once. That slight compression transfers a little of the darker brown onto the inner edge of your top lip, which creates that gradient naturally. Then use your fingertip or a lip brush to gently tap along the border where the two colors meet. You want a soft blur, not a sharp line.
The photo shows the lips full and slightly parted with visible texture. That’s the goal. Don’t over-blend. Don’t smooth everything out. The matte finish is supposed to look like lipstick, not like a filter.
Common Beginner Mistakes and How to Fix Them
You’ll probably mess this up the first time. I did. And that’s fine. The biggest mistake is using a dry, patchy lipstick that drags
Leave a Comment