`
You’ve got the iced coffee in hand, the leaves are turning, and your usual makeup routine suddenly feels too heavy. That’s exactly where the latte makeup look comes in. This tutorial walks you through the most important step, the under eye concealer, so you get that warm, glowy fall aesthetic without looking like you caked on a mask. Latte makeup is basically a warm, brown-toned neutral face that looks like you woke up glowing, and honestly, the under eyes can make or break it.
Why the Under Eye Area is the Real Star of This Makeup Tutorial
Here’s the thing about latte makeup. It’s all about the base. Since your eyeshadow is probably just a soft wash of warm brown and your lips are a nude gloss, the eye area has to be flawless and fresh. If you skip the concealer step or blend it badly, your whole face looks tired. And tired is the opposite of a cozy latte vibe.
I’m not talking about a full-coverage, matte, baking situation. That’s for a different era. For this look, we want the concealer to brighten the eye hollow, hide the blue-ish shadow, and blend into the skin like it doesn’t even exist. The goal is to look like you, but with less sleep deprivation and way more luminosity.
Look, most people think a makeup tutorial is about the eyeshadow. But this genre lives or dies on skin. Get the under eye right, and the rest falls into place.
Tools of the Trade: Brush vs. Beauty Sponge for Concealer
Let’s settle this fast. Sponges are fine, but they eat product. And if you’re on a budget, product waste is basically throwing money in the trash. A concealer brush is the secret weapon here because it lays the product down evenly without soaking up every drop.
I’ve got a dense synthetic brush I bought for $8 from a drugstore years ago. It still works better than a $30 sponge. The bristles press the concealer into the skin without dragging or pulling. And since it’s synthetic, it doesn’t ruin with oil over time.
Here is why I insist on a brush for the under eye concealer step instead of just patting with fingers:
- Less product waste, yes, but also a smoother finish.
- More control over where the pigment goes.
- It keeps your fingers from transferring natural oils onto the eye area.
- And honestly, it just feels more precise for the tear trough area.
How to Prep Your Skin for a Smooth Natural Makeup Base
If your under eye is dry or full of tiny peach fuzz, no brush in the world will save you. I learned this the hard way during a cold snap last November. I was rushing, skipped moisturizer, and my concealer looked like cracked desert floor. Not exactly the cozy fall look I was going for.
So, start with a bare face. Wash it, pat it dry, and apply a light eye cream. Wait two minutes. Seriously, let it drink. If your undereye cream is too heavy, you’ll get pilling, so stick to something light and gel-based.
Next, do the rest of your base routine. Actually, a quick tip if you’re wanting natural makeup: do your eyebrows first. Why? Because once the brows are done, you realize you don’t need as much concealer. A full brow means you can use just a thin layer of product under the eye, and that’s the real trick to avoiding creases.
Ah, and hydrate the face with a setting spray before you even start the base. It gives your skin a sticky, tacky base that grabs makeup like a magnet. I don’t know who invented that hack, but I owe them my life.
The Exact Stroke-by-Stroke Routine for Flawless Under Eyes
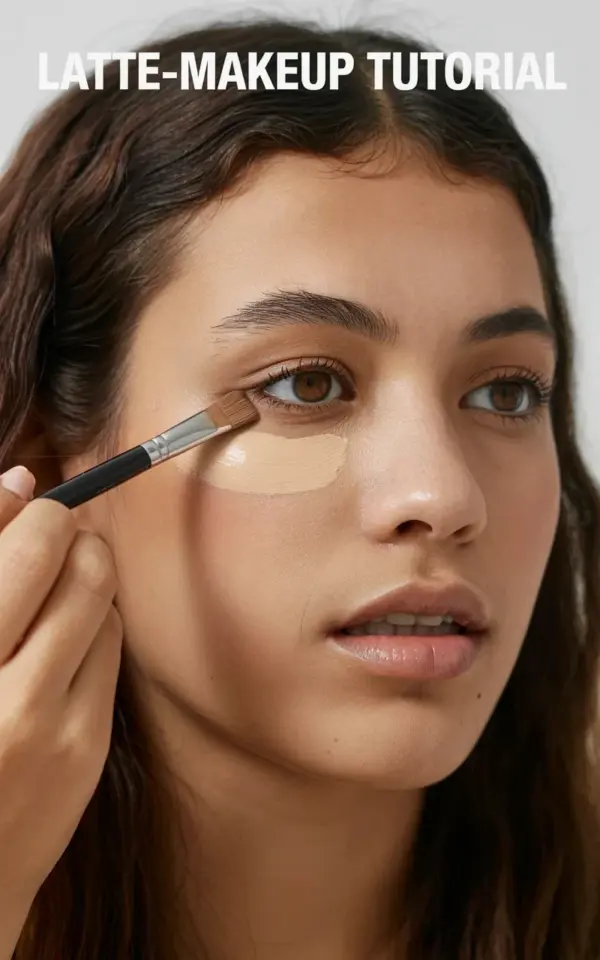
Ok so here’s the application process. This is the part where you get a close-up look, just like the tutorial photo with the woman in the soft lighting. She’s holding the brush right under the lash line, depositing a light-colored concealer into the inner corner and the deepest part of the eye socket.
First, apply the concealer in a triangle shape. But not a literal triangle. Keep it narrow at the inner corner and slightly wider as you sweep down toward the center of the cheek. That shape visually lifts the face without blocking out your cheekbone.
Let me walk you through the exact strokes I use:
Start with one dot of concealer on the back of your hand. Dip the flat part of the brush into it, making sure the bristles aren’t overloaded. Then, press, don’t stroke, the brush under the eye. Use a stippling movement. That means tiny little tapping motions directly onto the skin.
Once the product is placed, smooth it out toward the nose with the tip of the brush. The inner corner is where you want the lightest pigment. Drag a tiny bit of the leftover product down onto the top of the cheekbone, just to catch the light.
Finally, and this is the secret to the natural fall look, wait 60 seconds before setting it with powder. Let it settle into the skin and feel tacky. If you set it too early, it moves and creases. If you wait too long, it cracks. Sixty seconds is the magic window.
Also, don’t pump the concealer brush too hard. The skin there is fine, and pressing too aggressively just highlights the lines later in the day.
Best Concealer Formulas for a Glowy, Warm Finish
Let’s talk products, but keep it budget conscious. You do not need a $40 luxury concealer to pull off latte makeup tutorial vibes. Honestly, some of my favorite formulas are from drugstore lines that have improved massively over the years.
Look for a satin or radiant finish. Matte concealers are okay, but they age you and look heavy. This look wants a soft glow. I like a liquid concealer in a pump or with a doe-foot applicator. It spreads easier and blends faster than a pot formula.
A few of my favorite real-world options that won’t break your wallet:
The L’Oreal Paris True Match concealer is cheap and has a huge shade range. The finish is dewy without being oily. Honestly, it’s my go-to for this look. Another option is the Catrice Liquid Camouflage. That one is high coverage, so use a tiny amount.
One weird thing I have to mention: check the undertone. Latte makeup is warm, so you want a concealer that leans peachy or golden, not pink. If it’s too pink, it fights the warm brown eyeshadow and looks gray. You want it to melt into your skin, not sit on top.
And do not forget cream products. The concealer brush also works well for cream blush. Smear a little blush on the same spot you lightly bronzed, but keep it high. That warmth on the cheeks blends into the under eye area seamlessly.
How to Avoid Creasing and Caking in the Eye Hollow
Creasing is the enemy. It happens when your concealer pools into the fine lines under your eyes, and then it settles and looks like a tiny map of wrinkles. To stop it, you need to change how much you use.
I promise you are using too much. We all are. The first days of a new concealer purchase, everyone instantly squeezes too much out. One tiny dot per eye. That’s the budget version of a lesson: less product means fewer creases.
Press the concealer into the skin with your ring finger afterward.
This is a classic trick. Your ring finger is light, so it won’t drag the skin. After you apply with the brush, take a tiny amount of loose powder on a puff. Press it into the under eye area and let it sit for five minutes. Then whisk it away with a fluffy dome brush.
The warm the powder creates melts the concealer into a skin-like finish that stays put.
Budget-Friendly Product Swaps That Work Just as Well
I’m all for a dupe. Not just because it’s cheap, but because drugstore makeup is often buildable and breathable in a way some high-end makeup just isn’t.
Here are three swaps that save money without compromising the finish:
Swap your expensive setting spray for a DIY rosewater and glycerin mist. You mix a few drops of glycerin into a travel spray bottle with filtered water. Set your face with it and get a glowy, dewy sheen that lasts hours. It tastes weird if you spray it in your mouth, obviously, but the finish is lovely.
Swap a matte bronzer for a warm-toned eyeshadow. Look in your palette. Is there a single matte brown shade that isn’t too orange? Use that on the forehead and cheeks. It saves you the cost of a dedicated contour shade, and the leftovers on the brush can be used as an eyeshadow base.
And swap your expensive under eye powder for a translucent baby powder. Just make sure it’s talc-free and you don’t use too much. The finish is similar, and the price difference is huge.
I know, it sounds silly. But if you’re just starting out with the latte makeup trend, you don’t need to shell out for six different products. One palette, one concealer, one brush. That’s it. That’s the whole routine.
The Final Touch: Setting the Whole Look
After you’re done with the under eye concealer, finish the rest of the routine. Brush your brows, put on a warm lip gloss, and add a spritz of your facial mist. The mist melts all the powdery layers together, creating that blurred, natural look.
The photo you’re saving to your Pinterest board shows the light hitting the inner corner of the eye, right where the concealer was placed. You want a slight highlight there, but not glitter. This soft shine is what makes the face look alive.
Give yourself a final check in natural daylight. If you see streaks, use the brush to pat them out, never wipe. Wiping creates friction and moves the foundation. If it creases, take a dry q-tip and gently roll it along the line to remove the excess product.
That’s it. You’re done. The whole look takes about eleven minutes once you get the hang of the brush placement.
I love this routine for fall because it doesn’t fight the weather. The warm tones make your skin look sunny even when it’s raining outside. And it feels light enough for a day at the pumpkin patch or a casual lunch with a friend.
Save this post for your next get-ready routine. Your under eye area will thank you, and honestly, your wallet will like it too. The makeup routine is simple, soft, and actually achievable.
Let me know in the comments if you tried the brush stippling trick, or if you have a budget concealer that you swear by. I’m always on the hunt for a good drugstore find. Now go on, grab that coffee and enjoy your very natural, very warm fall look. 🍂
Leave a Comment